Host Key Verification Failed
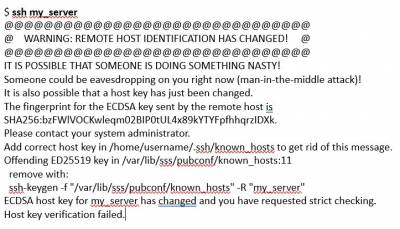
At some point you may attempt to SSH into a server, workstation or device, e.g. “my_server”, that you have logged into before and you encounter a long, scary message as follows that ends with “Host Key Verification Failed”.
Either this is a Man-in-the-Middle Attack where someone is pretending to be that server or the server has been rebuilt and is now using a new set of SSH keys and fingerprint to identify itself.
You should make certain you are going to the fully qualified domain name, where “my_server” is the short hostname and, for the Computer Science Department here at Vassar College, the fully qualified domain name is “my_server.cs.vassar.edu”. If you are in doubt then you should contact the people responsible for that server and let them know that you are getting this error message.
$ ssh my_server.cs.vassar.edu
You can go one step further and perform an “nslookup” on both the short name and the fully qualified domain name and see that you get the same IPv4 address for the workstation or server.
If you still get that error message when you attempt to SSH to the fully qualified domain name of the workstation or server, then the reason is most likely that the server was rebuilt. When you install an operating system, the server will generate new SSH keys. These new SSH keys for the server will be unique or different keys each time you install the operating system (even on the same server) and therefore the keys would not match the keys that were created during the previous install or buildout. The long error message provides you with information on how to correct the issue but generally that method is incorrect and does not work for this case. The easy way to remedy this is to read the error message and see what kind of encryption is being used, e.g. here it is reporting ECDSA at the bottom of the error message:
        ECDSA host key for my_server has changed and you have requested strict checking.
        Host key verification failed.
You need to add the new fingerprint of the remote workstation or server to your list of “known_hosts” as follows
$ ssh-keyscan -t ecdsa my_server >> ~/.ssh/known_hosts
This command will then output the version of SSH being run on the remote server and add the new fingerprint to your “known_hosts” file on your local system. This fingerprint was created when the operating system was installed on the remote system as part of the process in creating its internal SSH keys.
        $ ssh-keyscan -t ecdsa my_server >> ~/.ssh/known_hosts
        # my_server:22 SSH-2.0-OpenSSH_8.9p1 Ubuntu-3
NOTE: Depending on what name you use (shortname or fully qualified domain name) that is the name you should use in the above command. Grabbing a keyscan for “my_server” will create an entry for “my_server” but not for “my_server.cs.vassar.edu”. So you should run the command 2x as follows if you want to be certain you cover both cases.
        $ ssh-keyscan -t ecdsa my_server >> ~/.ssh/known_hosts
        $ ssh-keyscan -t ecdsa my_server.cs.vassar.edu >> ~/.ssh/known_hosts
Now you are good to go! You can now SSH into this workstation or server once again, provided you have been given access.
$ ssh my_server
and
$ ssh my_server.cs.vassar.edu
