SSH Keys on Microsoft Windows using the PuTTY Utility
SSH keys are what you will use to establish an encrypted connection over the network, e.g. the internet, between your system and a remote machine. The default type of key to generate is RSA which is good for most purposes. RSA is universally supported among SSH clients. Note that EdDSA performs much faster and provides the same level of security with significantly smaller keys. In general, though, for what you need to do, RSA encryption is the default for many applications should just work.
Section I. Install PuTTY
To create and use SSH keys on a device running Microsoft Windows, you need to first download and install both PuTTY and PuTTYgen on that device. PuTTY is the utility used to connect your device to a remote desktop or server through SSH, and PuTTYgen is the utility used to create SSH keys. On the PuTTY website, download the .msi file in the Package files section at the top of the page, under MSI (‘Windows Installer’). Next, install it on your local computer by double clicking it and using the installation wizard.
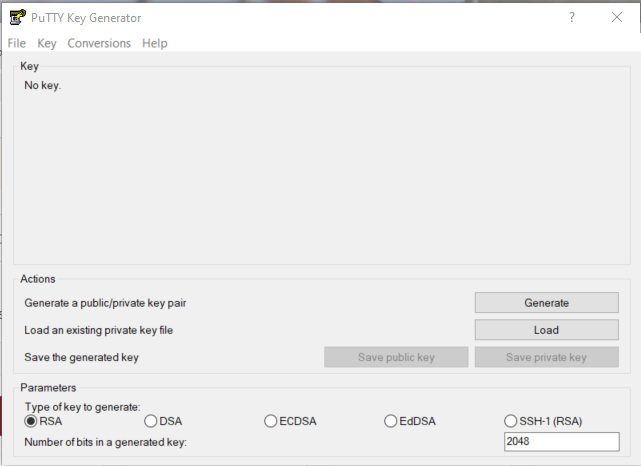
After the programs are installed, start the PuTTYgen program through your Start Menu or by tapping the Windows key and typing puttygen. The PuTTY key generation program will launch and open in a window.
Section II. Create a Set of SSH Keys
Click the button [Generate] to begin the process of generating a set of RSA keys. By “set” this means you will generate two keys, a private key and a public key. The public key is a key that gets installed on the remote host that you want access to. The private key is saved on the device that you are using and is not to be moved, shared or given to anyone, whence its name “private”.
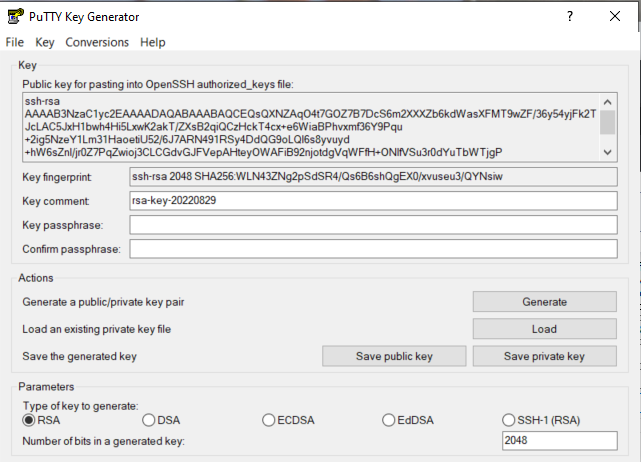
After you click [Generate] you will be prompted to move the mouse around in order to generate some randomness that will be used in the creation of your keys. After moving the mouse around for a short time, e.g. five or ten seconds, the program will create your keys and display additional information as follows. Note that what is displayed for values when you run the program will differ from what you are seeing here. It is the movement of the mouse that is used to help create the keys.
Notice that the public key is displayed at the top and that several other fields have been added. One notable field is the “Key Passphrase”. Some facilities require its users to set a passphrase whereas others leave it to you to decide. A passphrase is like a password that you must enter each time you use these keys. For now, we will choose to skip using a pass phrase and proceed to save our keys into files on our local system.
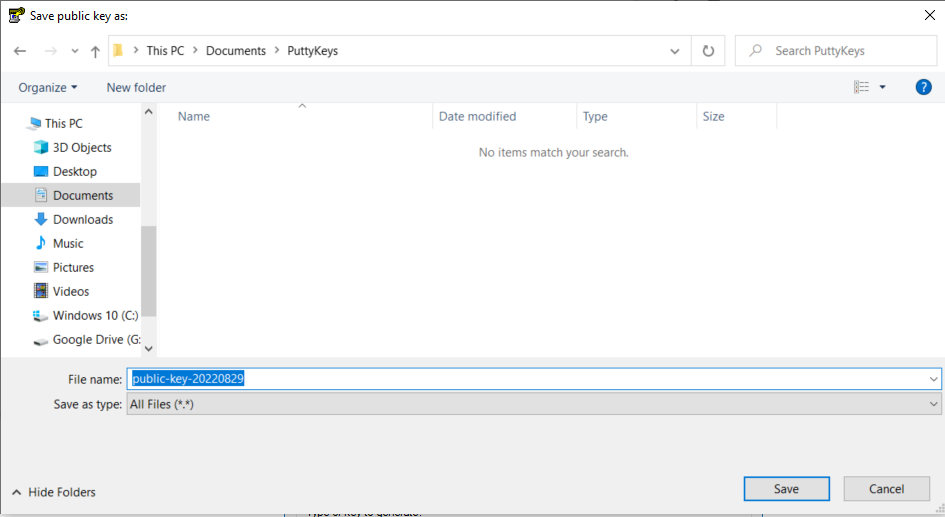
Click [Save public key] to save the public key to a file. This is the file that you will install on a remote host that you want to connect to using SSH keys rather than typing a password. A MS Windows “Save file” dialog box opens. You can create a folder called “PuttyKeys” or whatever you want to name it or simply save it to a location you will not forget and will not be deleted.
Once you save your public key, you need to save your private key. Click on [Save private key]. After you click [Save private key], if you did not set a passphrase, then you will be asked “Are you sure you want to save this key without a passphrase to protect it? If you don’t want to use a passphrase, then click [Yes] to close out the message box and proceed to save the file. Note that the file is saved with a PuTTY Private Key (*.ppk) extension.
To alleviate some frustration and pain on your part, we note that the format of the public key file in MS Windows is not very user friendly to the Linux world. So for now we are going to save the public key (not the private key!) again but in a text file. From the PuTTYgen utility you will notice the public key is displayed in a box at the top of that utility. Click on that window to highlight or select everything in that box. Copy and paste that information to Notepad. It is important to note that everything that is being copied is just one very long line. It is not two or three lines, but a single line. Make certain you paste it into Notepad and save it in the same location as your key files.
Section III. Install your Public Key on the Remote Host
If you can SSH to the host then you can copy and paste that PUBLIC key into a file under your home account as ~/.ssh/authorized_keys or /home/your_username/.ssh/authorized_keys
where the symbol “~” represents a shortcut for “/home/your_username”. If the hidden .ssh sub-directory does not exist, then you need to create it manually as
$ cd; mkdir .ssh; chmod 700 .ssh; cd .ssh; touch authorized_keys; chmod 600 authorized_keys
You will then copy/paste the public key into this “authorized_keys” file using your editor of choice.
Section IV. Configure a PuTTY Session to Use the Key file
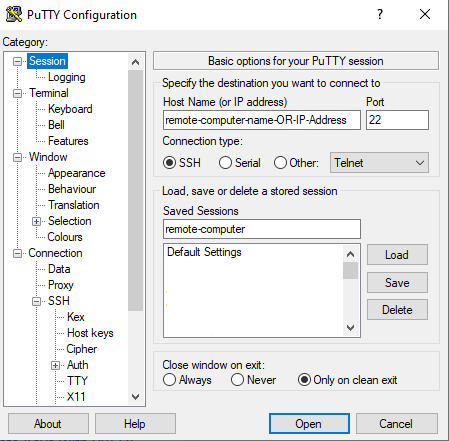
Launch the PuTTY utility program. Enter
Host Name or IP Address: remote-computer.cs.vassar.edu (or the IP address) Saved Sessions: remote-computer Port: 22
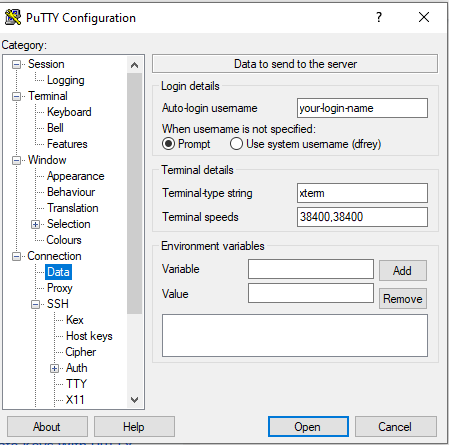
Next, under “Connection” select “Data” and enter your “username” which is the name of the account you will use to login with to the remote computer.
Auto-login username: your_loginname
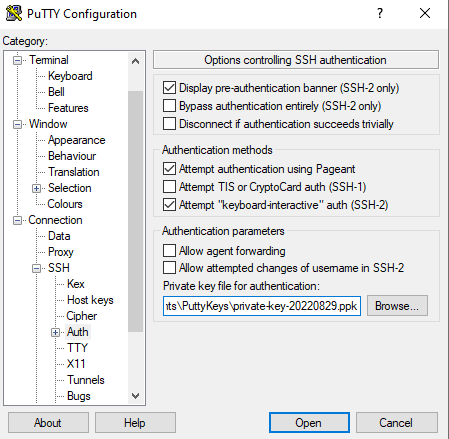
Now, under “Connection” click on “SSH” and then “Auth”. Click the [Browse] button and navigate to where you saved your private key in a key file. Select the private key file.
Finally, go back to the “Sessions” category and click [Save] so that this configuration will be saved and you won’t have to repeat these steps!
Now when you launch PuTTY all you have to do is locate under your saved sessions the session you want to use, click on the name once to select it and then click [Load] and then click [Open]. A shorter way to do this is to just double-click on the session name from the list of sessions and that will start a remote SSH session.
References
SSH Keys https://www.ssh.com/academy/ssh-keys
What are SSH Keys? https://www.appviewx.com/education-center/what-are-ssh-keys/
How to Create SSH Keys with PuTTY https://docs.digitalocean.com/products/droplets/how-to/add-ssh-keys/create-with-putty/
A more detailed PDF version of this page can be found here.
